Quick Tip: Photo enhancement in 10 seconds – Photoshop
In this quick tip I will explain how to easily enhance a photo using a very neat trick.
If you’re thinking about using Sharpen, it’s not a really good option, since it can ruin some details, such as hair or more detailed textures. If you overdo it, it will look really awkward.
So here’s the proper way to do it!
– Woman – by msaluste from SXC.hu
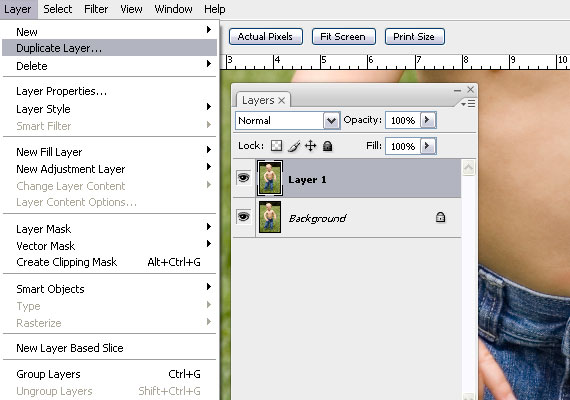
STEP 1
Open the image in Photoshop. Go to Layer > Duplicate Layer.

STEP 2
Go to Filter > Other… > High Pass. Set a value between 1-4 px or until you can see a raw contour of the objects in the picture.

STEP 3
Go to Window > Layers and set Blending mode to Overlay.


Done!
Original image

Differences
Hair
Observe how much the hair stands out more sand how clear it is. Check the eyelids also and notice the same change.

Skin
Notice the texture and the contrast between the midtones and highlights. The skin and lips are more clear now.

Overall effect
The picture looks more alive and provides more details. It’s as if you’d be standing in front of the real model.

Advantages:
- Enhances the sharpness
- Enhances the textures
- Enhances the contrast between shadows, midtones and highlights, especially for the small details, such as fur, hair or skin pores.
- Quick and easy.
- In most of the cases you don’t need to use other adjustments.
Did you enjoy this post? Share your thoughts!
wo ho…superb work…wow…thanks for sharing man….liked the tip
Gotta tell you, simple and effective way to enhence photo. Love it!
Thank you for beautiful Tip
Cool work…no doubt about that .. :)
Simple but cool tip! thanks for sharing :)
Hi
Very simple and effective tip..Thank you so much for this.
This types is so useful to the photo editors. I also do photo editing that’s why it’s very important for me. thanks for sharing this. Clipping path editor is always with you. Keep sharing such things.