Quick Tip: How to Create Halftone Vintage Effects in Photoshop
In this quick tip we will create a vintage halftone effect, fast and easy, with close to no effort. This can be applied to any image, regardless of size or detail, the dot size can be easily adjusted.
Difficulty: Beginner
Completion time: 1-2 min
Tools: Photoshop CS3
Resources:
– vintage police car by FantasyStock
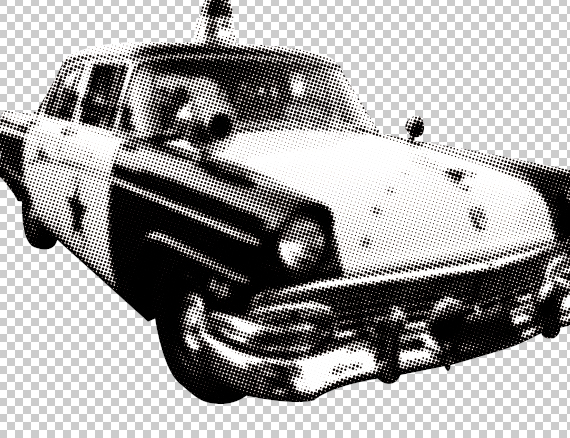
Final Image Preview
You’re probably thinking “Why, I just go to Filter > Pixelate > Color Halftone, desaturate it and I’m done!. Well, let’s see what happens when you do that, shall we?


Not that cool, is it ?
Here’s the clean way to do it!
STEP 1
Open the picture. In the Layers palette (F7), double-click the lock near the layer thumb and hit OK. Go to the Channels window (Window > Channels), select the “Blue” channel, right-click it and select “Duplicate Channel”. Hit OK.


STEP 2
Select the “Blue copy” channel and make it visible. Make the other channels invisible. Hit CTRL+M and shape the graph in an “S” curve. Hit OK.

STEP 3
Go to Filter > Pixelate > Color Halftone. Set it to 10 px and hit OK.

STEP 4
Select the entire canvas (CTRL+A), copy it (CTRL+C), click the “RGB” channel and paste it (CTRL+V).

STEP 5
Turn off the visibility of your current layer (Layer 1), select the “Layer 0” layer, grab the Path Tool (P), set it on Paths and trace the contour if your element.

STEP 6
Close the path and right-click > Make Selection. Turn on the visibility of “Layer 1” layer and select it, hit CTRL+C to copy it, then CTRL+V to paste it.


From here, you can color it in any way you like. Simply go to Image > Adjustments > Color Balance and add the tint of your own choosing. Experiment with it!

Thanks for this easy tutorial!
Great tutorial, retweeted!
thanks…
always liked the half dot in tshirt prints should come in handy
peace tim
Thanks!!!! It’s very useful tutorial for me! :)
As long as goods need to be manufactured and assembled, there will be plenty of job opportunities within businesses that serve a basic industry function.
Your article appearance precise and I am glad after reading
your article is very halpfull