How to create a droplet in Photoshop
A droplet is an executable file generated by Photoshop that allows you to apply a set of actions just by dragging and dropping files or folders onto it. This is a great time saver when you have to apply the same action to many files! If you do this manually, you’ll spend a lot of precious time and energy and probably get bored! We all want not to get bored.
Let’s say you have to resize 100 JPEGs, apply the same effect to 500 more JPEGs, or even better, resize, apply the same effect, and save them as GIFs. No problem! You create a droplet in Photoshop, and the job couldn’t be easier!
So, let’s create some droplets for ourselves, right?
Step 1. Create action
In this tutorial I used one of the images from our members area and Adobe Photoshop CS3 for PC. In this example, we’ll be making an action that will resize the image, apply a watermark to it and then save it as a jpeg file. You can download the droplet at the end of the tutorial.
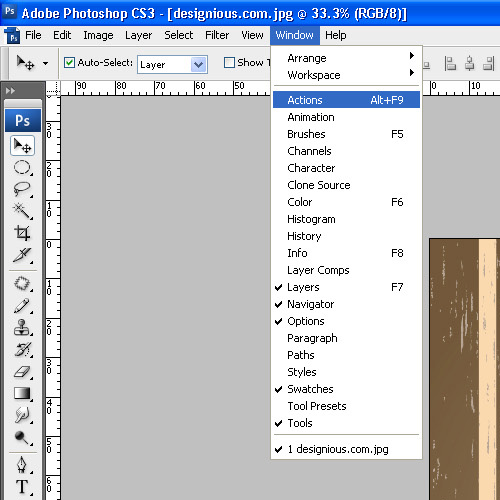
First open an image,then bring up the actions window from the Window -> Actions, or with the keyboard shortcut ALT+F9.

Press the create new action icon and name it suggestively, then hit RECORD.

Resize the image by going to Image-> Image Size


Now apply a watermark. (I used 10% opacity and a drop shadow with a distance and size of 5px and 0 spread for a white text)

Now save it as a jpeg file by goiing to File-> Save As or CTRL +SHIFT + S for PC and COMMAND + SHIFT + S for Mac users

When finished recording the action, hit the STOP button.
Step 2. Create droplet
This is the easiest part…go to the File menu -> Automate -> Create droplet.

The create droplet window is now open. Here are 3 submenus – Save Droplet In, Play and File Naming.

The only button in the Save Droplet In menu is the CHOOSE button. Click the choose button to select your saving location, and name for the droplet. Then, go to the Play submenu, and select the action you want your droplet to make, from the Action drop-down menu. Hit Ok when you’re ready setting up you’re options…aaaaand cut! That’s it, you’ve just created a droplet! All you have to do, is use it!
Step 3. Using the droplet
Identify the location of the droplet in your computer and start dragging and dropping files (or even folders, just look over the options in the droplet menu and you’ll figure it out in no time) on to the droplet!

The final outcome:

DOWNLOAD:
[download id=”29″]
Do you want to learn more about how to work with Photoshop?
See our Illustrator and Photoshop tutorials. They are all FREE. Also check all Free Vectors Category.
Interesting and helpful tips. I think that I learn most about photoshop from these tutorials. Thanks. If you have the time, please check out my logo contest on logo blog. You can win some great mac prizes.
Agora eu seeei!!! Muito Obrigado.
Droplet will not work when you use “Save As, or Save for Web” because the name you give it during saving, is written into the action. Therefore, every time a file is dropped onto the droplet it wants to overwrite the previous one. And yes I do have the Override “Save As” checkbox checked.
Thoughts?
Not sure what went wrong the first time, but I got it working now.
Ahh you picky photoshop you.
Lol.
What did you do? I had the same problem but it’s still overwriting the previous file.
Thanks for the good tut.
It may be a bit tricky with the “save as” thingy, I had some issues at first too, but I’m glad you worked it out, John! And I’m also very glad you liked the tut.
Come back for more:)
Good Tutorial! It was chosen for the home page of http://www.tutorialsroom.com
Waiting for your next tutorial :)
We discussed it two years back at this blog. ,
so techie and at the same time grungy , love it thank you
so techie and at the same time grungy , love it thank you
It really work for me.. thanks a lot.. its very useful for every designer…
thanks…
good morning,
just to know whether i can receive tips about photoshop software from time to time?
thank you very much for your helps
Indeed, you will. Just drop a comment and we’ll reply with a solution :)
In my droplets (which I would like to save as a Jpeg), every time I run the droplet it asks me for save as settings for each individual picture, kinda defeats the purpose… Am I doing something wrong?
I’ve never heard of Ps Droplets before – what a game changer! Anything that saves precious time like this is worth its weight in gold! Thanks for sharing it!
Thanks. Your guidance and tips are important and we appreciate your efforts for sharing this great information!
What a nice information photoshop cs3 . More than learning about how to create a droplet in photoshop. Many many learn this post.
Simplest explanation that I have found.
Thank you.