How to Create an Anti-Smoking Ad Concept with Photoshop
Today we will create a really cool anti-smoking concept design in Photoshop using only a few stock photo and some creative outside-the-box thinking. We will go through some interesting techniques you will definitely find useful, as well as some composition ideas.
Following this tutorial will not only learn how but also why a specific command or set of commands are used. The same goes for the composition.
Difficulty: Advanced
Completion time: 3-4 hours
Tools: Photoshop CS3
Resources:
– Woman by Marcus J. Ranum
– Cigarette ash by sxc.hu
– Smoke brushes by revn89
– Concrete texture by DesignTNT
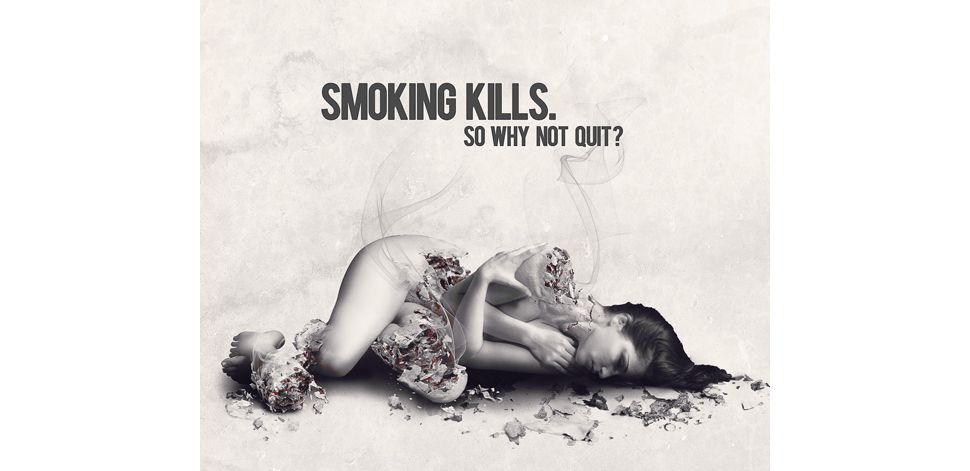
Final Image Preview
![]()
STEP 1
Create a new document of 2300 x 1600 px in RGB color mode at 72 dpi with “Transparent” background setting. If you intend to print it, set it at 300 dpi.
![]()
STEP 2
Open the “model” picture. Now it’s time we remove the background and copy the model. In the Channels window, click the channels and see which one give the image the most contrast. In this case, it’s the “Red” channel. Right-click it and select “Duplicate Channel” and hit OK.
Note: The channel with the most contrast varies from picture to picture, it is up to you to decide which.
![]()
STEP 3
Select the “Red copy” channel. Now we must bring the channel to a max contrast between the background and the woman’s outline.
![]()
Go to Image > Adjustments > Levels (CTRL+L) and adjust the sliders like in the image below. This is a simple way to increase the contrast a bit.
![]()
STEP 4
Grab the Dodge Tool (O), set it on Midtones with a 37% Exposure and lighten the areas around the woman’s hair and body.
![]()
STEP 5
Grab the Path Tool (P), set it on Paths and trace the bottom area of the woman’s body. We need to remove the shadows; we will create our own.
![]()
STEP 6
Right-click > Make Selection and hit OK. Grab the Brush Tool (B), hit D, then X (D sets foreground and background colors to black and white; X switches them) and paint the entire selection.
![]()
STEP 7
Go to Select > Deselect (CTRL+D). Grab the Dodge Tool (O) and lighten the rest of the background.
![]()
STEP 8
Grab the Brush Tool (B) again, hit X and paint over the woman; cover it entirely with black. Go to Image > Adjustments > Invert (CTRL+I), and then CTRL+click the channel’s thumb and switch to Layers palette. Click the layer thumb and copy the selection (CTRL+C).
![]()
STEP 9
Go back to our document (CTRL+Tab) and paste it. Hit CTRL+T to enter Free Transform mode, center it, double-click the layer’s name and rename it to “woman base”.
![]()
STEP 10
CTRL+click the layer thumb to load a selection, then go to Select > Refine Edge. Use the settings below and hit OK. Hit CTRL+D (Select > Deselect) to deselect. Grab the Spot Healing Brush Tool (J) and click on any skin imperfections to clean them up.
We want a contrast between the smoothness of the skin and the grunginess of the cigar ash, that’s why we need a perfect skin.
![]()
STEP 11
Open the “Cigarette ash” picture. Go to Select > Color Range and click the red background. Use the setting below for “Fuzziness. Hit OK.
![]()
STEP 12
The selection is not very precise, but it does most of the work. Hit Q to enter Quick Mask mode, and then grab the Brush Tool (B), set Hardness to 100% and paint over the remaining additional areas. Use “[“ and “]” to adjust the brush size.
![]()
STEP 13
Hit Q again to exit Quick Mask mode and copy the selection (CTRL+C). Go back to our document (CTRL+Tab) and paste it. Go to Image > Adjustments > Desaturate (CTRL+SHIFT+U) to desaturate the image.
![]()
Open the “concrete” picture. Grab the Clone Stamp Tool (S), set the tip to a soft brush, ALT+click in a cleaner area (shown below) and click over the circled spot.
![]()
Hit CTRL+SHIFT+U to desaturate it, then CTRL+L and use the settings below. We will use this as background.
![]()
STEP 14
Name this layer “ash” and turn off its visibility. Now we should decide the areas where we want “cigar burns.” Create a new layer (CTRL+SHIFT+N) and name it “sketch”. Grab the Brush Tool (B) and roughly sketch where the burnt areas should be.
![]()
STEP 15
Click the “lock” icon to lock this layer and make it uneditable. Grab the Move Tool (V) and CTRL-click the model to make it the current layer. Hit CTRL+J to duplicate the layer and set its Blending mode to “Multiply”.
![]()
STEP 16
Duplicate it again (CTRL+J), desaturate it (CTRL+SHIFT+U) and set its Blending mode to “Screen”. Select all these layers and hit CTRL+G to place them in a group. Name this group “model”.
![]()
STEP 17
With the layer group still selected, go to Layer > Layer Mask > Reveal All. Now Grab the Brush Tool (B), hit D and paint over the marked areas. We will tweak this after we add the cigar ash, so make a rough brushing.
![]()
STEP 18
Select the “ash” layer and duplicate it (CTRL+J) and make the copy visible. Hit CTRL+T to enter Free Transform mode and resize it. Place it like below.
![]()
STEP 19
Go to Layer > Layer Mask > Reveal All. Grab the Brush Tool (B) and paint over the extra areas. If you masked too much of the model, select the “model” layer group mask and paint over with white (Hit D, then X to set Foreground color to pure white).
![]()
STEP 20
Now the image will get complex, and we’ll have a ton of colors we could get influenced by. My strategy is to see everything in grayscale, so I can decide on the colors without any distractions.
Select the top-most layer and go to Layer > New Adjustment Layer > Black & White. Hit OK, then lock the layer.
![]()
STEP 21
Repeat STEPS 18-19 to create the other areas. This is entirely up to you, choose any areas you like. Make sure you place some large ash drops, it will show the time spent burning.
![]()
![]()
STEP 22
Let’s light it up! Create three new layers (CTRL+SHIFT+N) and place them above the “Black & White 1” adjustment layer. Name them “dark red”, “red” and “yellow”. Create a new layer and name it “palette”. Grab the Brush Tool (B) and paint these colors on it, and then lock it.
![]()
STEP 23
Select the “red” layer, grab the Brush Tool (B) and set the tip to a soft, round brush. Hit “1” to set its Opacity to 10% and paint soft red spots, as below. Hit “7” and paint stronger red spots on the interior and set the layer’s Blending mode to “Color Dodge”. To pick the color, hold the ALT key and click the red color from the “palette” layer).
![]()
![]()
STEP 24
Select the “yellow” layer and set its Blending mode to “Overlay”. Grab the Brush Tool (B), select a yellow color and draw small spots.
![]()
STEP 25
Select the “dark red” layer and use a darker red to increase the fire contrast. Set its Blending mode to “Multiply”.
![]()
STEP 26
It’s time to create some environmental lighting! Create two new layers (CTRL+SHIFT+N) and name them “body shadow” and “body light”. Place them in the “model” layer group and above all the layers in the group and ALT+click between the layers to create a clipping mask.
![]()
STEP 27
Set the “body shadow” layer’s Blending mode to “Multiply”. Now grab the Brush Tool (B), set the tip to a soft, round brush and a 40% Opacity, select a dark gray color and paint only the shadows near the ground.
![]()
STEP 28
Select the “body light” layer and set its Blending mode to “Soft Light”. Hit D, then X and use the Brush Tool again to paint the lights on the body.
![]()
![]()
STEP 29
Create a new layer and place it below the “model” layer group and above the “ash” layer (the one with the ash on the ground). Set its Blending mode to “Multiply” and use the Brush Tool to paint the shadows.
(29)
The ash also has a darker area of its own, so create some using the same technique in the areas shown below.
(29.1)
Here’s a neat trick! Use an opaque brush to draw the strong shadow and a faded brush to draw a soft shadow a bit further from the model.
STEP 30
The ash will also drop tiny shadows on the ground, and we need to paint that too. Create a new layer similar to the previous, but place it below the ash layer and paint small dark spots below the ashes.
STEP 31
Now we have a cool detailed illustration, but we also need a message to go along with it. I chose “Smoking kills. So why not quit?” text. When you want to send a message, don’t put fancy stuff on the font unless you want it to be a type treatment.
Grab the Horizontal Type Tool (T) and click-drag a type box. Type in “Smoking kills.” and set the font to “Bebas”. Make it large.
![]()
STEP 32
Repeat STEP 31, but make the font smaller and the “So why not quit?” text.
Why make it smaller, you ask? The answer is simple: the size difference creates a visual path and makes the text easy to read. Exploit this by putting the important text in the larger text box to attract attention.
![]()
STEP 33
In the Layers palette, click the “fx” button and select “Blending Options”. Use the “Drop Shadow”
setting shown below and hit OK. ALT+click-drag the “fx” icon to the other text layer to duplicate these settings.
![]()
![]()
STEP 34
Let’s add mood to the overall design! Select the top-most layer (the “yellow” layer) and go to Layer > New Adjustment Layer > Gradient Map. Click on the default gradient, set it like below and hit OK. Set its Blending mode to “Lighter Color”.
![]()
STEP 35
Turn off the visibility of “palette” and “sketch” layers. Select the “Gradient Map 1” layer, select the entire artwork (CTRL+A), copy merged (CTRL+SHIFT+C) and paste it (CTRL+V). Go to Filter > Other > High Pass. Use a 1.5 px setting and hit OK. Set its Blending mode to Overlay.
Done!
If you want, you can add some smoke using some stock brushes. You can download them from the link in the “resources” tab.
![]()
[download id=”180″]
Editor’s Note: This post was originally published in August 2011 and has been completely revamped and updated for accuracy and comprehensiveness.
great great great
Very useful tutorial… and one of the factors for that creativity is for drinking COFFEE :)
Yes, it is. I went through quite a few concepts before ending up with this one. Also finding the right stocks was the hardest part.
Very good, i like the idea, I’ll come up with something similar, for good…!!!
Thanks – This blog is great! so glad i fount it!
Lovely, probably totally ineffective as a stop smoking ad for people like me though, me would just have a good look at the poster while walking by, be subconsciously reminded of the fact we currently smoke then spark up another cigarette as we walk off thinking “that’s pretty damn good photo-manipulation going on there”.
niceeeeeeeeeeeeeeeeeeeeeee
you have done a great job, but some of the steps you did at the beginning don’t make any sense at the end.
Amazing.. Very nice,
very nice
thanks :D
good job
awesome
gud jog
kerennnnn
Hi there,
its realy nice work but just wanna know if you have video tutorial for this. Can you send me the link if possible would be realy appriciate that.
Thanks,
Unfortunately, I haven’t created a video of this and at this point, i can’t find the time to make one. But i can assist you with the steps. Just drop a comment and i’ll reply.
great …….great ……No words ! Really awesome
I found: Concrete Textures set for free:
http://vandelaydesign.com/blog/free-resources/concrete-textures-3/
Good post. I learn something new and challenging on blogs I stumbleupon every day. It will always be interesting to read articles from other writers and practice a little something from other websites.
Great effect! But, I’m stuck at step 17. When I select the Brush tool and try to brush over the marked areas I get the dreaded “not allowed” symbol.
I have grouped the 3 “woman base” layers as you said in step 16, and I have this group layer selected.
Appreciate any help. Can e-mail you screen captures if that helps.
And I’m working on a Mac…
Thanks
Robert
Great and very useful tutorial! I used Flame Painter for the last step and it really added the right mood to the picture.
Amazing tutorial. Gonna try it out as soon as i get home :)
Thx man
Whoo amazing tutorial. I wish i could have your talent. Just amazing :)
Impressive, I like it! The instruction is so clear. I am practicing photoshop now and this would be the best choice to master it.
Really great creative photoshop tutorial about antismoking ad concept design. Thanks for sharing this tutorial with us.
good
Wow what a grate.. & thank for your tutorial Mr.Doink
Is there a PSD for this that I can fiddle with? I learn best when I can play with actual layers and see what is done on each one!
Thank you!
1zqjic'”(){}:/1zqjic;9