How to Draw Wicked Skull Drawings or Vector Skulls in Illustrator
Wicked skull drawings are quite a simple task at a glance, but once you start sketching, it probably looks different from your reference (you are using a reference, right?). Then it begins to go out of proportions, looks deformed and has no expression whatsoever. But this is OK, it is a part of the learning process – please do not let this get to you! I, myself have gone through this and every other artist has, as well.
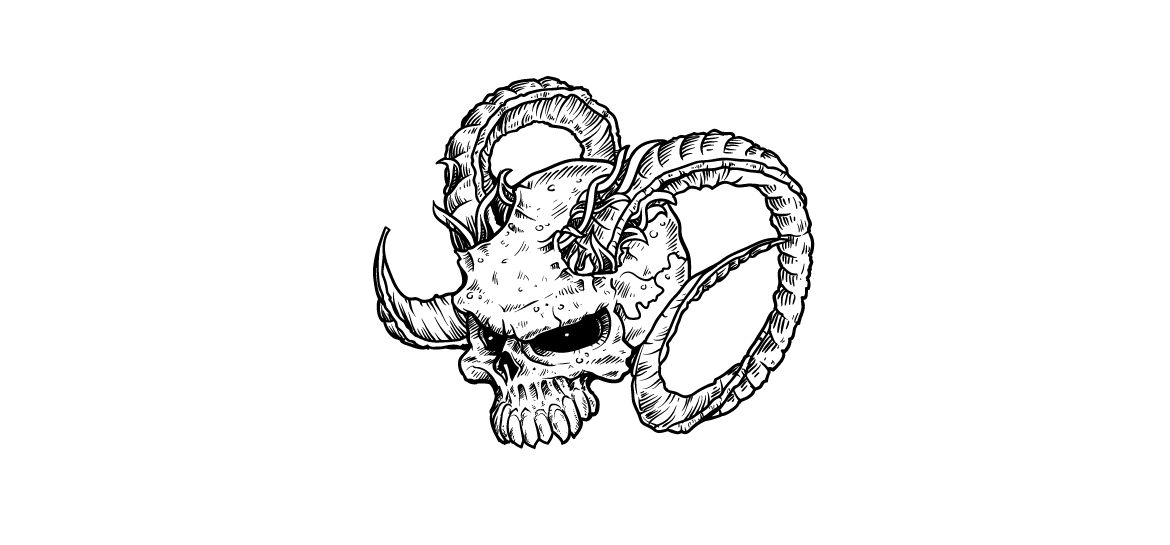
This tutorial will show you how to draw evil skulls quickly, as well as learn a bit of anatomy along the way. So let’s draw some really evil and nasty skulls – the right way!

References
First, we need to learn the anatomy of the skull and for that we need a few references, which I am sure you can find on Google images – skull images from Google
Sketching
For wicked skull drawings, we start with simple geometrical shapes, just to block in the contour. Use only short, straight lines, do not draw curves yet. A sketch is supposed to be rough; you can adjust it quickly to correct any mistakes. In short terms, keep your roughs rough and your cleans clean.
Unlike regular human skulls, you can add expressions and alter its overall shape to become more aggressive.
Check out: 750+ Minimalist Animal Art & Cartoon Images
Now that we have a pretty good idea of how to draw one let’s draw one in a perspective view.
Check Out: 5 Steps For Drawing Vector Sun Rays
Simple shading
Now that we have knowledge of the outline let’s make it pop out from the paper! In the sketch below, I’ve marked the 3D shape with a grid. Grab your pencil and paper and mark it on your sketch as well.
I’m asking you to do this because you have a good photographic memory (you’re an artist, right?) and drawing it yourself will turn the image you see on the screen into an elaborate process customized only for you. It becomes a dialogue between you and the paper and makes it easier to understand and memorize.
Check Out: How to Create Flat Design Illustration?
Outline
Now that we have a complete understanding of the shape, we can start adding polished details. Let’s begin with the outline and the sharp lines that define it. For that, we will use two pressure-sensitive brushes.
For the contour, we’ll use the thicker brush and for the inner details, a thinner brush. A strong outline makes it stand out, and it does not confuse the viewer, so outlining like this is a must.
Here’s a little trick to use for the outline: in the areas where you have a shadow, make the outline a bit stronger than the rest. Not only you can dispose of the shadow, but it will add more volume to the overall design.
Check Out: The Grand Bundle of 2800+ Illustrations
Details
Grab the second brush we created and let’s start drawing, shall we? This is a very tricky part; we only want the outline to suggest the shape and not draw the entire contour. Keep in mind that the brain can make you see a defined shape even if there are just a few lines. In the image below, I’ve drawn a skull, and you can tell it’s a skull at first glance, even if it doesn’t have a high level of detail.
So let’s apply this principle to our drawing.
Check out: 5000+ Kids Illustrations & Patterns Bundle
Shading
This part is similar to the simple shading, but this time you have to pay attention to the line spacing and length. Start drawing the basic shadows, then just fill the white gaps with random, short strokes. That’s about it. One important aspect: Keep in mind the position of the light source. If you draw this for a garment print, the light source is not critical and you must sacrifice everything to the visual impact. A t-shirt will look cool if you manipulate the line spacing and thickness, not shading and lighting.
Check Out: Adobe Illustrator Tutorial: How to Draw a Character
Extra details
The bone structure is not very smooth, especially if you draw something old and decayed. This enables you to add shaky lines, just to add a wee bit of texture, holes, cracks or tiny dents. It’s these details that make a huge difference; I recommend you do this for everything you draw from this point on. It is a personal touch and shows how much effort you’ve put into it.
Saving
Select the full artwork and expand the strokes (Object > Expand Appearance…), then hit the “Merge” button in the Pathfinder window. Hit it one more time if you still have Stroke. This is a technical aspect you must do for a couple of reasons: when someone else wants to scale it, the strokes will not scale along unless you explicitly set them and the source file will have a smaller size.
Check Out: 1100 Watercolor Illustrations Bundle
Done! Your easy to draw evil skull is ready!
Download source
[download id=”183″]
Editor’s Note: This post on how to draw skulls was originally published in October 2011 and has been completely revamped and updated for accuracy and comprehensiveness.
Upgrade your drawing skills! Check out this 2D Character Illustration Tutorial
Like this post? Check out more inspirational and informational articles on Graphic Design.
Awesome tutorial! Thanks Doink. I think I’ll give it a shot and produce a version with no hatch work and maybe more bold positive/negative contrast that could be used on a pumpkin carving for tonight!
i love this pic it is the best one i seen
design is so LOUD and aggressive ..pretty awesome! :)
I wish I could draw in illustrator! :( you’re so good, I’m jealous. :D
I know who will like this one.
Menino..muito bom. Obrgado
It's awesome.
It's awesome.
Hey man!
What is this version of Illustrator? CS3 or CS4?
I used CS3. But it doesn’t make a huge difference, the techniques used can be used in an even earlier version.
Hi to every one, it’s genuinely a nice for me to pay a visit this site, it includes valuable Information.
Hi there,
I love the awesome tutorial! I would very much like to create such art, but my drawing skills are lacking that department. Is it possible to learn how to draw like that??
Thanks!!!
Q
there are a few youtube channels that explain quite well how to draw stuff. ProkoTV is one of them, check it out.
dude, Thank you so much for this tutorial.
I cant wait to try it right now
And now crystal clear which the Crazies was fmeild on a shoestring budget planning again and forth (in the moment) the manager, but do not permit that acquire away exactly what is in fact a really great movie. An outbreak of your lethal virus in a tiny city in The united states and just before any individual could assume, the military arrive to try to prevent its spread across the region. I liked that this image is unsentimentality characters. The decisions of daily life and death are taken at breakneck speed and with minimal issues. The film moves in a very fast pace, using the action starting more or less immediately and do not brain truly properly dark until the conclude. There are actually some familiar topics discussed: the role of your military in periods of crisis, how persons react to events past their control, etc. etc. It the viewer to decide how these matters are resolved. Or better but, just take pleasure in what’s decent and well-written (if cheaply produced) production. 1 aspect that I discovered incredulous plot wise was the possibility which the virus could be infested metropolis nuked! It seemed incredibly above the highest for me.