Tutorial: Illusion of transparency – Vector rays
In this tutorial we will create cool rays with gradients without using ANY transparency settings, ideal for .eps files, which do not have a support for gradient-on-gradient transparency. Here’s a preview of our final image.
- Difficulty: Intermediate
- Completion time: 15-30 minutes
- Software: Adobe Illustrator 8 or higher – I use Illustrator CS3.

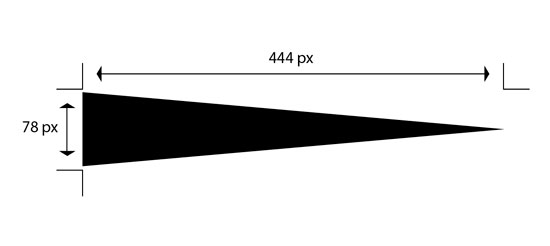
STEP 1
Grab the Polygon Tool (in the Rectangle Tool submenu) and draw a triangle – click-and-drag, then press the Down arrow to reduce the number of sides. Also hold the SHIFT key to place it into an orthogonal position. Set Fill to #000000 and no Stroke. Using the Selection Tool (V), rotate it 90 degrees clockwise.
Set its dimensions like below.
STEP 2
Select the triangle. Now grab the Rotate Tool (R), hold ALT key and click the anchorpoint where you have the smallest angle, the one that’s marked in the image below.

STEP 3
In popup window, set the angle to 30 degrees and click “Copyâ€. Now press CTRL+D (duplicate command) 10 times. It should look like below.

STEP 4
Select all rays using the Selection Tool (V). Grab the Twirl Tool (in the Warp Tool submenu), press Enter and use the settings below. Center your mouse cursor over the shape and click once.

STEP 5
It should look like the image below.

STEP 6
Select all rays, then copy them (CTRL+C), then paste them to front (CTRL+F). Use the Rotate Tool to rotate them 15 degrees – hold ALT and click the center of the rays, then set the Angle to 15. Hit OK. It should look like below. Select all rays and go to Object > Group (CTRL+G). Also give them another color.

STEP 7
Grab the Rectangle Tool (M) and click the canvas. Now set both Width and Height to 600 px. Hit OK. Also give it a blue color and make sure it has no Stroke.

STEP 8
Select only the rectangle and go to Object > Arrange > Send to back (CTRL+SHIFT+[ ). It should look like below. Place the square over the rays, select all and using the alignment tools (top side of your screen), hit the “Horizontal Align Centerâ€.

STEP 9
Now click the “Vertical Align Center†button. Along with STEP 8, this will create a perfect alignment, so we don’t get any offsets further on.

STEP 10
Select only the square, copy it (CTRL+C) and paste it to front (CTRL+F). Now go to Object > Arrange > Bring to front (CTRL+SHIFT+] ). Remove its fill. Now it should look like below.

STEP 11
Select all, then go open the Pathfinder window (Window > Pathfinder) and click the “Crop†button. It should look like this.

STEP 12
Go to Path > Clean Up to remove the un-necessary anchorpoints.

STEP 13
Select all artwork, go to Gradient window (Window > Gradient) and add gradients to the square, black rays and red rays with the settings below.


STEP 14
Select it and resize it to fit your page while holding SHIFT key to constrain its proportions and you’re done.

If you want, you can add different motifs, stars, circles, different shapes and use the same technique to make them pop up. A fast, but not so precise method is to lighten the colors: click the “Recolor Artworkâ€, click the “Edit†button, then toggle the “Lock harmony colors†(broken chain icon) and move the slider a bit to the right.
In the source file I added a couple of examples of what you can do with this technique.

The source file for this tutorial is available in the link below.
[download id=”144″]
Cool little tutorial :D
Amazing.. thanks
Great site. A lot of useful information here. I’m sending it to some friends!
Awesome!! thanks for the post……
Well, i just started learning illustrator. photoshop is musz easier for me :) Thanks for very well written tut.
I really love this tut, thanks a lot
I get as far as step 12 and when I apply the radial effect it does not look like the image provided. Help? Also, I cannot download the source file?
You have to be logged in to get the source file.
You can add motion blur in the reendr settings. It is located in the drop down with GI and AO. You will want to select subframe motion blur and say how many samples you wish to do. You need to be in the picture viewer to see the motion blur reendr out since it takes multiple frames into account.Another method is to reendr out a vector motion blur pass and bring it into AE and then you have the ability to control it through the ReelSmartMB plugin. But the first option will solely be in C4D.