How to create a paisley seamless vector pattern
Inspired by Indian culture and brought back in the 1960s, the paisley prints still give a glamorous feel to textile prints. The crooked teardrop or half of a yin-yang seamless pattern is present on women’s skirts and handbags, men’s silk neckties, bandannas, and not only. As a tribute to the 1960 we’ve recently introduced a Paisley Seamless Vector Pack on our main website and we’ll also take you through the process of making a vector paisley seamless pattern using Adobe Illustrator CS3 for PC. You can download the vector file at the end of the tutorial.
1. Create the paisley shape with the pen tool

2. Create an ellipse scatter brush and then apply it to the paisley shape. Feel free to change the size and spacing as you wish.

3. Expand the brush(Object>Expand), ungroup it from the paisley shape and then send it to back(SHIFT+CTRL+D.

4. Create another paisley shape inside the initial one and then apply again, the ellipse scatter brush.

5. Repeat Step 4 and change only the size.

6. Create an ellipse and using copy/paste in front (Ctrl+c/Cctrl+f), create another one and so on. You could also use blend tool if you want.

7. Create a hexagon inside the tiniest ellipse.

8. Add the Pucker & Bloat effect( Effect>Distort& Transform>Pucker & Bloat)

9. Create more flowers and fill the rest of the shape with them(use different colors to create contrast)

10. Create a square and align it to your artwork, which should be 600×600 pt.

11. Take the paisley shape and randomly put it on the Y ax. You will see that the y=630 pt.

Ctrl+c/Ctrl+f and shift till you get to the bottom of your artwork. This shape will have the coordinate y=30 pt.

13. Do the same thing as in Step 11 & 12 , but on the X ax. The first shape has x=-30

14. The second x= 570. The summary of the two coordinates must always be 600pt. (ex. 630-30=600 pt, 570-(-30)=600pt )

15. Fill the rest of the square with different colored paisley shapes.

16. Duplicate the light green square, bring it to front and change the fill with the stroke.

17. Select all the shapes and the stroke (do not select the square) and apply the Crop Filter from the Pathfinder Panel (CTR+SHIFT+F9).

18. Ctrl+A and Clean Up

19. Verify your pattern by duplicating it.

20. Make sure you save it at 600 x 600 pt. ENJOY!

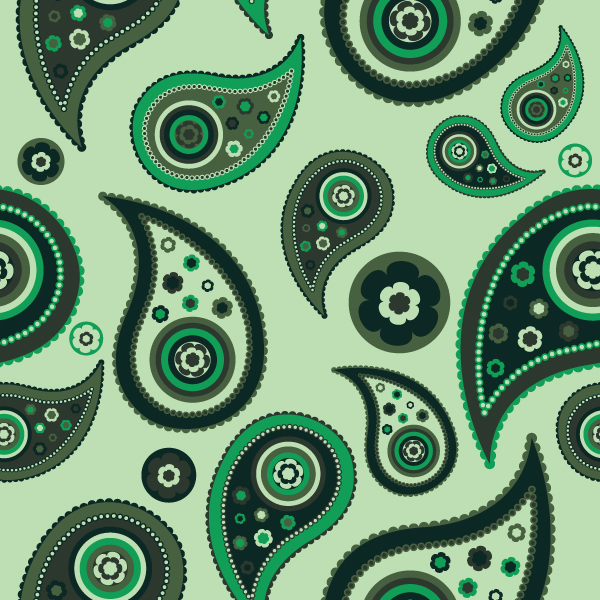
FINAL IMAGE

[download id=”48″]
Do you want to learn more about how to work with Photoshop?
See our Illustrator and Photoshop tutorials. They are all FREE. Also check all Free Vectors Category.
That’s a beautiful pattern.
Very good tutorial! Thanks, I linked your blog ;)
Nice tut, thanks.
Pity there’s no option to enlarge images to see the brushes settings…
Pretty cool tutorial, it is a shame though, that the images are a bit blurry and there is no option to enlarge them… :(
Lovely tutorial – super helpful as I transition from primarily photoshop to illustrator…thanks so much for sharing!
Help! When I went to clean up…all my colors disappeared! What can I do?
Fantastic tutorial, I really enjoyed reading it!
Keep up the good work!:D
How do you use the crop command without having it slice up the paisly pattern inside your square? I have tried your technique and it slices up each section. So now I have a pattern but my main image (an ocean of waves) is sliced all over the place with lines (like an outline).
Wonderful !!!
Thank you this is awesome!
About the thin lines you might sometimes get in Illustrator when tiling a pattern, this explains it:
http://kb2.adobe.com/cps/322/322821.html
So it really is just an illusion and doesn’t mean the pattern is broken. :)
nice pattern congratulations
how can i download this pattern??
thanks!
hi, how can i download this pattern?
Thanks a lot. very useful tutorial :)
Hi! The tutorial is amazing!!
But, I have a problem. In the edges, after cropping, my flowers go like play-doh. I don't know why, but they look distorted.
Thank you again for the tutorial and the possible help.
Great work!!!!!!
IS OK
Gorgeous. Thanks!
boote jeghe
boote jeghe
Came in Handy! Thanks alot!
I keep having the same problem when making the ellipse scatter brush. Even though make an ellipse and it’s solid in color, when I drag it to the brushes and start to make the new brush stroke it changes to just the ellipse stroke and no the solid ellipse. Please help!
Thanks
wow, this is so amazing man!it inspires me! thank you. wow! :)
how did you get your paisley shape to come out so well. mine looks terrible and my boss wants a paisley logo.
nice curl design
so nice !!
how to download T.T