Drawing vector portraits Part 1: The facial structure
In this tutorial I will explain the basics for portrait drawing. These guidelines are a must to know and will help you a lot in your future portrait drawings. This is only the first part and I will post more in the close future, so make sure you stick around for more.
So let’s begin.
Front view
Every drawing starts from a basic shape that we later on model it as we like. The same rule applies in drawing a portrait. First, draw a vertical axis that will serve as guideline, so you don’t misplace the eyes, ear, nose, mouth or any other detail. It’s important you keep a nice symmetry, especially when your subject is directly facing you. Look at the picture below how the face geometry is built.
First, you have to identify the dimension of the eye, because this will be the reference dimension we will use to build the rest of the face. Have you ever seen a portrait artist working? If you did, you must have noticed his gesture holding the pencil with the arm extended forward, closing one eye and moving his thumb on the pencil. That is the technique used to measure the proportions using the pencil as a ruler and point-of-view as measurement unit.
In short terms, here’s the skinny of the basic proportions:
- Face width is approximately 5 times the eye’s length
- One eye’s length between the eyes
- Face height is 7 to 8 times eye’s length
- Forehead is at least 3 times eye’s length
- Nose is 2 times and a bit the eye’s length
- Mouth is about 3/4 of an eye’s length
- Chin is about an eye’s length.
- Ears have the same height as the nose
A simple rule when you’re drawing is “Keep your roughs rough and your cleans clean.†This means you shouldn’t spend too much worrying about the details yet, just leave it as a rough sketch and focus on getting the proportions right.
Here’s a quick trace of the figure. I made it a bit transparent to get an idea of how it will look later on.

Profile view
For the profile, you need to learn new geometric proportions. In the image below you will see the approximate dimensions and angles, all reference to the eye’s length, seen from profile.
Keep in mind that this isn’t an exact measurement and you need to adjust them accordingly. There are lots of types of figures and some of them do not fit in these rules. Those are called amorphic figures and their geometry differs completely from this one, but I will explain them in a future post.

Notice that I preserved the proportions from the front view? Ears have the same height as the nose and the proportions between forehead, nose, mouth and chin are about the same. Always try to preserve the proportions from different views, it will help you in difficult points (if you’re stuck at some point, it’s a very high probability you are going the right way!). Now we have new variables to consider: cranium’s size, distance of the ear from the tip of the nose, the neck’s angle, the jaw’s angles and neck’s muscles.
At some point you’ll be tempted to make the cranium smaller, because you think it’s too big. Don’t. This is a very huge mistake that will end in having a very small forehead and have no room left for the brain. Also when you’ll draw the hair, it will cover the eyes, so all that work in putting a nice expression will be lost. Just make it big. Don’t worry; you’ll cover it with hair eventually (unless you’re drawing a bald figureJ ).
The shape of the skull differs from one region to another: Europeans have a round and a bit flat on top skull, Asians have a very rounded one and Africans have an oval-shaped skull, extended on the back side. This means that the facial proportions will be different. For example, Africans will have the jaws more in front then an European, nose bridge is different and the lips’ position and size differ.
Here’s a quick trace of the sketch. We will use it in future posts as a base for the rest of the face’s parts.

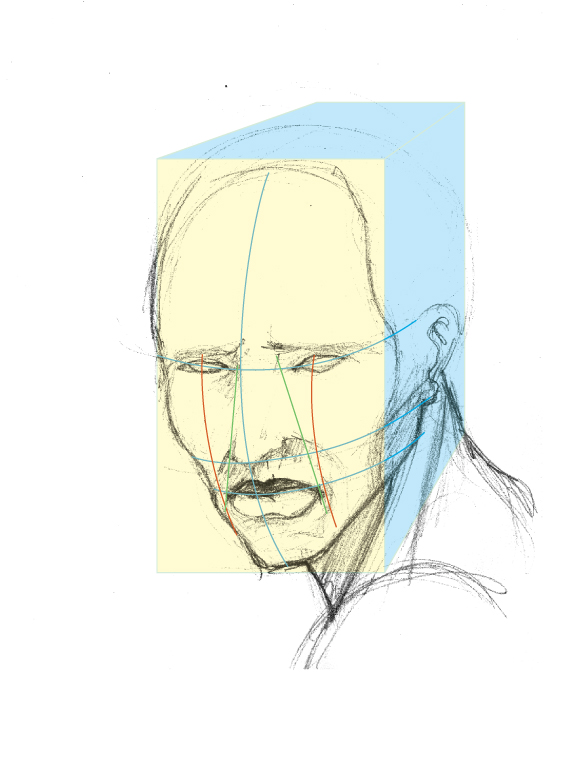
Perspective view
Now for the perspective view. Since you’ll create a tri-dimensional view, you’ll require another set of rules. As a first, you must keep in mind that dimensions are altered and you need to estimate them as accurately as you can. Remember that art allows you to make mistakes, but being an artist means you must decide which ones you will keep.
To constrain the proportions, imagine that the head is in a box. Just capture the front side’s proportions and the rest will follow or just add a line where you think you wouldn’t see beyond it if you would see your portrait from the front. To start easy, draw a circle; this will be your top side of the figure. Now the axises will be curves and not straight lines, but they preserve the parallelism.
If you want to see the mistakes you made, just turn your drawing upside down or reflect it. You’ll immediately see what’s wrong and you’ll be able to fix it. Once you’ve got the proportions right, make rough sketches of the eyes, mouth, nose and visible facial muscles and the portrait is half way to the end.

The source file for this tutorial is available in the link below.
[download id=”147″]
In the next post I’ll explain how to draw a detailed, realistic eye, so make sure you stick around.
I’ll gladly answer any related questions if certain things are left yet unclear.
Is this post useful to you? Share your thoughts!
Wow this is a great resource.. I’m enjoying it.. good article
I’ve recently started a blog, the information you provide on this site has helped me tremendously. Thank you for all of your time & work.
This help me very much. Thank you.
Thanks for sharing the knowledge – I’m researching to build my first human form sculpture as a fabricator/blacksmith and need to understand these proportions. – Eric
別メーカーですが、私も金具がよく外れるので、100均でカラビナ(ねじ式にロック出来るタイプ)を上下の金具に付けています。
Vi nos seus esboços detalhes que não havia visto em nenhum outro site para iniciantes e que permitiram entender muito mais sobre desenho. Muito obrigado pela postagem e pela ajuda !!!