How to create a Modern Heart Concept in Photoshop
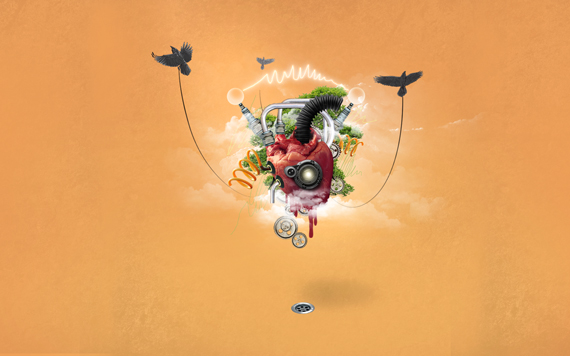
In this tutorial we will create a Steampunk-ish concept design, but with a slightly different approach. Instead of the rusty and old look, we will use cleaner and shinier elements. We will also make use of nature elements, vectors and some brushes.
Along with creating the image, you will learn how to:
– Extract an element from a picture
– Make effective use of tools
– Photo retouching
– Photo manipulation
– Creating scenarios
– Use adjustment layers effectively
Difficulty: Intermediate
Completion time: 2 hours
Tools: Photoshop
Resources:
– heart from Resurgere
– gears from Redheadstock
– camera from Neokeitaro
– Jack plug from sxc.hu
– drain from sxc.hu
– pipes from sxc.hu
– Spiral tubing from sxc.hu
– Black tubing from sxc.hu
– Cloud brushes by JavierZhX
– Dirt texture from sxc.hu
– Bonsai from Resurgere
– Spray Paint Brushes 1 from designious.com
Final image preview

STEP 1
Create a new document of 1680 x 1050 px in RGB color mode at 72 dpi.

STEP 2
Go to Layer > New Fill Layer > Solid color. Set the color to #8e6535 (midtone brown).
Why use a Fill Layer instead of filling it with Paint Bucket (G) ? Well, if you move the layer around, it will still have the entire canvas covered.

STEP 3
Open the “dirt texture”. Select it (CTRL+A), copy it (CTRL+C) and paste it into our document. Resize it to fit our document by click-dragging the corners. Hold SHIFT key to preserve proportions. Go to Image > Adjustments > Desaturate (CTRL+SHIFT+U).

STEP 4
In the Layers palette (F7), set Opacity to 10%. Then click the “Add Vector Mask” button. Then grab the Brush Tool (B), set Hardness to 0%, hit “3” to set its Opacity to 30%, hit D to set foreground color to pure black and paint over the center area and some random, more dark areas of the texture.

STEP 5
Go to Layer > Duplicate Layer (CTRL+J), then move it to the right. Duplicate this command and place the second copy to the left.

STEP 6
Select the layer mask of the first copy, grab the Brush Tool (B) and paint with black over the edges to blend them in. Do the same for the second copy. Then go to Layer > New Adjustment Layer and add the following: Brightness/Contrast, Gradient Map and Exposure. Use the settings below.


STEP 7
Open the “heart” image from the hearts pack. Now grab the Pen Tool (P), set in on Paths and trace the outline of the heart. Then right-click > Make Selection. Copy it (CTRL+C) and paste it (CTRL+V) into our document.

STEP 8
Go to Edit > Free Transform (CTRL+T). Make it smaller while preserving proportions, then right-click > Flip Horizontal and reduce its height a bit. Hit Enter.

STEP 9
Go to Layer > New Adjustment Layer > Color Balance. Use settings like mine or similar. Make sure you check the box with “Use previous layer to create Clipping Mask”.

STEP 10
Go to Layer > New Adjustment Layer > Gradient map. Select the gradient Shown below, remove the shown colors from it and hit OK. In the Layers palette (F7), set Opacity to 30%.

STEP 11
Open the “black tubing” picture. Extract it like you did with the heart and paste it into our document. Hit CTRL+T to enter Free Transform mode, make it smaller and hit Enter. Use the Eraser Tool (E) to remove the extra areas.

STEP 12
Place it like below. Then grab the Rectangular Marquee Tool (M), select the area like below, then right-click > Layer Via Copy.

STEP 13
Go to Layer > Duplicate Layer (CTRL+J), hit CTRL+T, rotate it a bit, place it like below and hit Enter.

STEP 14
Repeat STEP 13 till you obtain something similar to below.

STEP 15
Select the layer with the plastic tubing, grab the Path Tool (P), set it on Shapes and draw a shape like below.

HINT: Here’s a nice way to quickly select layers: in the Selection Tool (V), check the “Auto Select” box and select “Layer” from the drop-down menu. To use it, simply click the image you want to work on.
STEP 16
In the Layers palette (F7), click the “fx” button and select Blending Options. Use the settings below.


STEP 17
Select all the layers that refer to this tubing and hit CTRL+G to place them in a group. Double-click this layer’s name and type “black tubing”. Then go to Layer > New > Layer (CTRL+SHIFT+N).

STEP 18
Create a new layer (CTRL+SHIFT+N), set the Blending Mode to Multiply. Then grab the Brush Tool (B), set Hardness to 0% and Opacity to 40% and paint the shadows of the tubing, like below.

STEP 19
Open the “pipes” picture, extract one pipe like you did with the heart. Place it like below.

STEP 20
Go to Layer > Duplicate Layer (CTRL+J). Place the second copy like below. Repeat this and place the third copy as shown.

STEP 21
In the Layers palette, click the “Add Vector Mask” button. Then grab the Brush Tool (B), set Hardness to 0%, Opacity to 100% (press “0”). Paint over the area where the pipes need to blend in. Do the same for the image below it.


STEP 22
Open the “spark plug” picture. Make a cutout as before, copy it and paste it into our document. Also resize it and place it like below.

STEP 23
In the Layers palette (F7), click the “Add Vector Mask” button. You can also do this by going to Layer > Layer Mask > Reveal All. Grab the Brush Tool (B), set Hardness to 100%, hit D and paint over the areas shown below.

STEP 24
Go to Layer > Duplicate Layer (CTRL+J). Hit CTRL+T to enter Free Transform mode, rotate it and place it like below.

STEP 25
Open the “camera” picture and cut out its lens. Copy it, paste it into our document and place it as shown below. Also go to Image > Adjustments > Desaturate (CTRL+SHIFT+U), then hit CTRL+T, right-click > Flip Horizontal. Hit Enter.

STEP 26
Grab the Selection Tool (V), go to Layer > Duplicate Layer (CTRL+J), then press “down” and “right” arrows to nudge it a bit. Repeat this until you obtain a nice thickness for the objective.

STEP 27
Select all these layers except the on from the top and go to Layer > Merge Layer (CTRL+E). Then go to Layer > New > Layer (CTRL+SHIFT+N) and place it below the current one. Set Blending mode to Multiply.

STEP 28
Grab the Brush Tool (B), set Hardness to 0%, Opacity to 40% (hit “4”), hit D and paint a shadow like below. Make the brush smaller to create a more intense shadow near the objective.

STEP 29
Using the technique learn so far, import more objects in the document: the spiral tubing, the jack plug, the gearwheels and the drain.

STEP 30
Open the “bonsai” picture from Resurgere. In the Layers palette, double-click the “lock” near the layer’s thumbnail. Hit OK.

STEP 31
Grab the Crop Tool (C) and crop the image to only see the tree.

STEP 32
Go to the Channels window (Window > Channels) and click-drag the “Blue” channel on the “Create New Channel” button.

STEP 33
Go to Image > Adjustments > Curves (CTRL+M) and adjust the graph like below.

STEP 34
Grab the Burn Tool (O) and paint over the gray areas inside the tree. Repeat until all the leaves are black.

STEP 35
Grab the Brush Tool (B), hit D, then X and paint over the roots of the tree. Make sure Hardness is set to 100%.

STEP 36
In the Layers palette, CTRL+click the “Blue copy” channel thumbnail. This will make a selection of the body.
Turn on the “RGB” channel’s visibility and turn off the “Blue copy” ‘s.
Go to the Layers palette (F7) and hit Delete. Then go to Select > Deselect (CTRL+D).

STEP 37
Click-drag this layer into our document, press CTRL+[ to set it below the previous layer. Press multiple times until it’s placed behind the heart layer. Then press CTRL+J to duplicate it. Resize it, rotate it and place the copies to create a nice background for the heart.

Notice that i decided to light the camera lens? To do this, create a new layer above it, grab the Brush Tool (B), hit 5, select a light yellow color and click multiple times. Resize the brush progressively using “[“ and “]”.
STEP 38
Select the layer with the texture, then go to Layer > New > Layer. Now grab the Brush Tool (B), set Hardness to 0%, set foreground to a bright yellow color, hit “4” then draw two strokes like below. Set Blending mode to Linear Dodge (Add) and Opacity to 20%.

STEP 39
Create a new layer (CTRL+SHIFT+N), go to the Layers palette (F7) and set blending mode to Multiply. Repeat the step above, but use black instead of yellow and paint it below the heart. This will be the shadow.

STEP 40
Create another layer (CTRL+SHIFT+N), open the “cloud brushes” (just double-click them, they will load automatically), grab the Brush Tool (B), hit D, then X, select a brush and paint some clouds. Hit “4” to make some faded clouds also.

STEP 41
Create multiple layers like this in different layers in-between other elements and with different opacities.

STEP 42
Open the “ravens” vector pack from designious.com. Grab the Rectangular Marquee Tool (M), select one of the birds, copy it (CTRL+C) and paste it into our document. Resize it to fit the scenario.

STEP 43
Create a new layer (CTRL+SHIFT+N), then grab the Path Tool (P), set it to Paths, then draw a path like below. Grab the Brush Tool (B), set it to 3 px and a dark color (black will do just fine), switch back to Path Tool (P) and right-click > Stroke Path. Select Brush from the drop-down menu, check the “Simulate Pressure” box. Hit OK.

STEP 44
In the Layers palette (F7), click the “Add Vector Mask” button. Grab the Brush Tool (B), set foreground color to black (hit D) and paint over the area shown below.

STEP 45
Repeat STEPS 42-44 to add multiple ravens.

STEP 46
For those of you who own a tablet, create a new layer, grab the Brush Tool (B), set it to 1 px, pick some bright colors and paint random hatches and lines. With a mouse, you can use STEP 43 to create those.

STEP 47
Go to the “spark plug” image and copy again the selection. Paste it into our document, resize it and place it like below. Duplicate it (CTRL+J), hit CTRL+T, then right-click > Flip Horizontal and place it on the opposite side. Place these layers behind the heart.

STEP 48
Create a new layer and draw a 2 px line like below, using the Brush Tool (B). In the Layers palette (F7), click the “fx” button and select Blending Options. Use the settings below.

STEP 49
Grab the Ellipse Tool (U) and draw two circles on top of the spark plugs. Then, in the Layers palette (F7) set Fill to 0%. In the Blending Options, use the settings below.


STEP 50
Open the Spray Paint 1 brush pack from designious.com, select a brush, resize it using “[“ key, hold ALT key to pick a dark red color from the heart, hit CTRL+SHIFT+N to create a new layer and click on the canvas. Make it look like below.

Done!
You can download the source file from the link below:
[download id=”166″]
Its very useful postings..Explained in very much detailed..Like it.Thanks for sharing
Thank you so much for sharing this and also the step by step instructions on how to create a modern heart. The final output is very artistic.
Awesome post! thanks a lot for sharing..
congratulations for this great tutorial and also thanks :)
super cool,sir
That’s why i ♥ DSLR cameras. Mine isn’t that detailed.I like the feathered one most :D
Cool concept. We posted it on BestPhotoshopTutorials.net with a link back to your site.
Very nice tut :)
We found this post through a 3rd party service and decided to test if it was a legit source for high-end photoshop tutorials…well, we came out with a fantastic end-product. Thanks for the awesome instructions, guys!
This is a very unique tutorial. Thank you.
Amazing Tutorial
nice tut !
Sir step 36 is confusing for me any help. please.
Great tutorials thank you for sharing with us
Unpredictable work that absolutely fantastic!
No words !!!!! The thinking of Doink is so creative. If any one show only the Output cant think how it happen. Thanks the see that types of Tutorial.
Just wondered to see it. A complete image manipulation work that is live and mind touching. Thanks.
This is a most important blog and it’s very helpful for us. Thanks for sharing .
Thanks for sharing your valuable experience. I think every man heart the touch to the blog.
Great post. Thanks for sharing this awesome photoshop tutorial.
Wonderful Post. thank you so much for sharing your article.
Hello, your post about modern heart concept in photoshop is really a unique idea. Thank you for that kind of valuable photoshop post.
So helpful and informative post. As a Photoshop Designer , this kind of post truly help me. Thanks a lot.
This photoshop content looks pretty nice to me. May be this will help a lot of fellas out there.