How to create a Magnificent Rose Concept Design in Photoshop
Today we will create a very interesting concept using an artistic nude and a couple of pink roses. You will learn to retouch photos, manipulate a single element to obtain a more complex result, make use of various adjustment layers, increase the depth of a picture and sharpen the image for a more clean look.
So let’s begin.
Difficulty: Intermediate – Advanced
Completion time: 1-2 hours
Tools: Adobe Photoshop CS3
Resources:
– nude model from Marcus J. Ranum’s DeviantART stock
– Zipper
– Bouquet of roses from SXC.hu
– Pink rose from SXC.hu
We start from a blank document with a size of your convenience (1600 x 1000 will do, you can crop it later).
STEP 1
Open the “nude model”, Select all (CTRL+A), copy it (CTRL+C) and paste it into our drawing.

STEP 2
Go to Filter > Other > High Pass and give it about 2.2 px and hit OK. In the Layers palette (F7), set Blending mode to Overlay. Then go to Layer > Merge Visible (CTRL+SHIFT+E). This simple effect will sharpen the image a bit.

STEP 3
Grab the Pen Tool (P) and carefully trace the girl’s body, but without the head and hair, just the part with skin. Make sure the Pen Tool is set on Paths. Once you close the contour, right-click > Make Selection. Hit OK.

STEP 4
Grab the Rectangular Marquee Tool (M) and right-click > Layer Via Copy. We will need a copy of the skin to work on. Grab the Clone Stamp Tool (S), ALT+click a clean area of the skin, then click in the areas where you see imperfections. Make sure you ALT+click in areas of similar tones to your target ones.


STEP 5
Go to Filter > Blur > Surface Blur and use settings similar to mine. You can tweak them a bit, but don’t overdo it or it will look like paint daubs. This effect smooths up the surface while preserving the original texture.

STEP 6
Go to Filter > Noise > Add Noise and set it to 1%. Hit OK. This will also be a nice touch on the skin, it will make it look silky.

STEP 7
Go to Layer > New Adjustment Layer > Selective Color. Use the settings below for the different colors. This effect will reduce the warmth in the skin and make it a more model-ish look.

STEP 8
Select the layer with the original picture. Go to Layer > Duplicate Layer (CTRL+J). Grab the Brush Tool (B), toggle on Quick Mask mode (Q) and paint over the girl’s hair. For the loose hair locks, use a thin, soft brush. Place this layer above all layers.

STEP 9
When you are done, exit Quick Mask mode (Q), go to Select > Inverse (CTRL+SHIFT+I), then click the “Add Layer Mask” button in the Layers palette (F7).

STEP 10
Go to Layer > New Adjustment Layer > Levels. Use the settings below. Then ALT+click-drag the layer mask from the layer below it and place it over the one of the adjustment layer (this is how you copy a layer mask). When you will be prompted to replace it, hit OK.

STEP 11
Open the “zipper” picture, select all (CTRL+A), copy it (CTRL+C) and paste it into our drawing. Go to Edit > Free Transform (CTRL+T) and resize it. Hold ALT key to preserve its proportions and place it like below. Hit Enter to exit Free Transform mode.

STEP 12
With this layer selected, hit CTRL+G to place it into a layer group. Then double-click the layer icon in the Layers palette (F7) and name it “zipper”. Now go to Edit > Transform > Warp and make the entire shape curved, like below. Hit Enter.

STEP 13
In the Layers palette (F7), click the “Add Layer Mask” button. Grab the Brush Tool (B), set Hardness to 0%, Foreground color to pure black (#000000) and cover the leather texture of the zipper, leaving only the metal part and the area where it’s sown.

STEP 14
Grab the Pen Tool (P), set it on Paths and trace the metallic side of the zipper. We need to edit it a bit, to make it shinier.

STEP 15
When you’re done tracing, right-click > Make Selection, grab the Rectangular Marquee Tool (M) and right-click > Layer Via Copy. This will create a new layer containing your selection and placing it above your current one.

STEP 16
Go to Image > Adjustments > Desaturate (CTRL+SHIFT+U). Then go to Image > Adjustments > Brightness/Contrast. Use settings similar to mine or feel free to use your own.

STEP 17
Select the layer below your current layer and set its Fill to 44%.

STEP 18
Open the “bouquet” picture. Grab the Pen Tool (P) and extract the flowers shown below using the same technique as for the girl’s body. Right-click > Make selection, grab the Rectangular Marquee Tool (M) and right-click > Layer Via Copy.

STEP 19
CTRL+click the newly created layer thumbnail in the Layers palette (F7), copy it (CTRL+C) and paste it into our drawing (CTRL+V).

STEP 20
Make it smaller, like below. Hold the SHIFT key to preserve its proportions.

STEP 21
Go to Layer > Duplicate Layer (CTRL+J) multiple times and arrange the copies into a bouquet like below. Place them over the zipper and do not worry about precision, we will create a layer mask to hide the unwanted areas.

STEP 22
Select all the flowers layers and hit CTRL+G to group them together. Then double-click its name and type “roses 1”.

STEP 23
Open the “pink rose” picture and extract the flower using the same technique as in STEPS 18-20.


STEP 24
Also create multiple copies and place them a bit more rare than the first ones. Feel free to resize, rotate and reflect them at will.

STEP 25
Also select all these layers and hit CTRL+G to group them together. Name it “roses 2”.

STEP 26
Create a new layer above these two layer groups (“roses 1” and “roses 2”) and go to Layers palette (F7). Set Blending mode to Color Burn.

STEP 27
Grab the Brush Tool (B), set Hardness to 0%, set Foreground color to a dark red and Opacity to about 40%. Make sure Flow is set to 100%. Now paint over some dark areas of the roses. No need to be picky, just choose random areas. This layer will add more depth to the flower bouquet. This is how my layer looks like after painting it.

STEP 28
Select “roses 1” and “roses 2” layer groups and hit CTRL+G. Turn off the visibility of the newly created group. (click the “eye” in the Layers palette). We will now create a layer mask for the bouquet of roses.

STEP 29
CTRL+click the layer with the zipper, then go to Select > Inverse. Select “group 1” (I named it “roses”) layer group and click the “Add Layer Mask” button in the Layers palette. You can also use the Pen Tool (P) to create a selection.

STEP 30
Select the layer mask, grab the Brush Tool (B), set Foreground color to pure black (#000000) and paint over some areas where the roses are near the zipper. This will create the illusion that some flower petals go over the zipper.

STEP 31
Repeat STEP 31 for some falling petals and some on the ground.

STEP 32
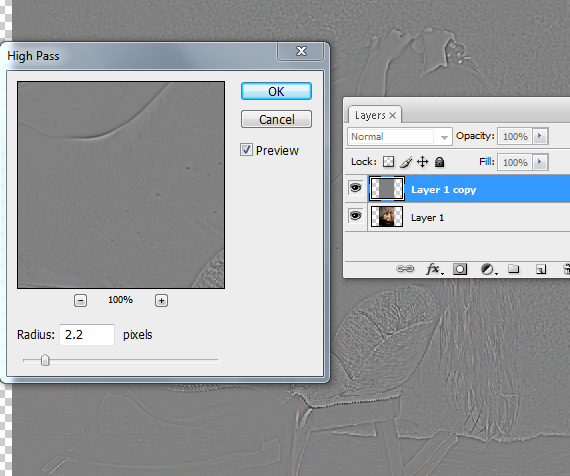
Select the original layer with the girl and go to Layer > Duplicate Layer (CTRL+J). Then go to Filter > Other > High Pass, give it a 2.2 px, Hit OK, then set the layer Blending mode to Overlay.

STEP 33
Select the layer with the girl’s skin. Create a new layer (CTRL+SHIFT+N), set Blending mode to Multiply and Opacity to 35%. Grab the Brush Tool (B), set Foreground to a dark brown and paint some shadows over the girl’s body. Since now we have new elements in the picture, the lighting will change also.

STEP 34
Select the top-most layer group. Go to Layer > New Adjustment Layer > Exposure. Use the settings below or similar.

STEP 35
Go to Layer > New Adjustment Layer > Black & White. Use my settings or feel free to use your own.

STEP 36
Select again the original layer with the girl, duplicate it again and go to Filter > Blur > Surface Blur. Use very low settings, this effect will clean up a bit the image and preserve the textures.
Done!

You can download the source file from the link below.
[download id=”163″]
That s really good idea. But I think if you blend more color to it, it will be better.
Excellent work! it was really helpful! thanks a lot.
Nice concept and great tutorial!
The idea is really good but the result not so much :) it needs more work and attention to the details !
Very interesting, I have just written some Flash Photography Tips and I thought you might find them useful.
nice idea but the flower is not very matching with the dody when its open the zip u should use more flower 2 better
gooooooooooooooooooooooooooooood
Beautiful post i really appreciate reading such kinds of blogs. Thanks for sharing such
Excellent concept of thinking looks amazing graphic design, thanks