How to create a dragon on a burning castle
In this tutorial we will create a fantasy picture with a dragon on a ruined burning castle.
The files I used are the following:
- Castle image
- Iguana image
- Crocodile from Google Images. You just need the teeth, so any hi-res picture of a croc head would do nicely.
- Bat image
- Fire pack
- Fire pack 2
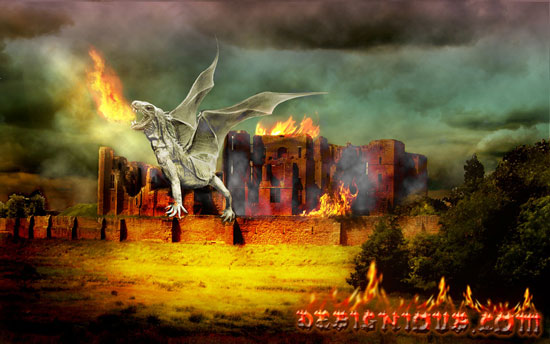
This is a preview of our final image.
STEP 1
Create a 1680 x 1050 px new document. I use this size because its my desktop resolution so it fits as a wallpaper without stretching the picture.
It’s meant for wide screen, but feel free to use your own settings, just make sure it is a high resolution.(1)

STEP 2
Open the “castle” picture, press “CTRL+A” to select it, copy it (CTRL+C) and paste it (CTRL+V) in our drawing. Resize it to fit the page.
Also name this layer “castle”, we will edit this later.

STEP 3
Open the “iguana” picture and use the Pen Tool to outline the iguana. I suppose not everyone can use this tool without having trouble with some big loops, so I’m going to explain how this works.
So: grab your Pen (P), set it on “Paths” (a small icon in the top right corner of your screen) and click a point near the iguana. Make sure it’s on the outline.
Next click on a point in the vicinity of the first one and drag mouse or graphic pen until you get a curve like this one below.

At some point, you will find areas that have a sharp corner like the image below so when you click and drag to make a new path curve, it will automatically smooth that area to have a
more fluid flow. But we don’t want Photoshop to control us, don’t we? Go back one step (CTRL+Z), hold ALT key (Option for Mac OS users) and click the anchor point.
Notice the “angle” thingy on your mouse cursor? That tells you you’re about to turn that anchor point into a sharp corner.
STEP 4
Repeat STEP 3 until the whole iguana is contoured. When you’re done, right-click and select “Make selection”. Give it 5px feather and click OK.
You’ll know when you have a selection when you see the “marching ants” line. Copy and paste it in our drawing. Name this layer “dragon body”.
![]()
STEP 5
Place it over the castle in a possible physical position. Resize it if you see fit to.
Hit CTRL+U to open the Hue/Saturation window and adjust Hue to give the lizard a green tint. make sure the “Colorize” option is checked.(5)

STEP 6
Open the “bat” picture and cut out the wing, same as STEPS 3 and 4. Then paste it in our drawing. Also repeat STEP 5, with the Hue/Saturation.
Resize it and place it like in the image below. Name layer “wing1”. In order to keep things organised, we’ll place these layers in a group named “dragon”.

STEP 7
Use Warp Tool (Edit > Transform > Warp)to stretch the wing a bit to have a more slim look. Don’t overdo it though. Copy the “wing1” layer (CTRL+J), flip it horizontally
(Edit > Transform > Flip horizontal) and make it a bit smaller. That will be the other wing. It should look like this:

STEP 8
Drag the “dragon” layer group onto the “New Layer” icon in the Layers palette twice. This will copy the entire group. Then merge each copy. Do NOT merge them together though!
Select “dragon copy (merged)” layer and press CTRL+L to open the Levels adjustment. Move the cursors around and try to give it a darker tint. Do the same for the other copy.
Let’s create some layer masks for the re-lighting of the dragon, shall we ? Select one copy of the layer and go to Layers > Layer Mask > Hide all. Do the same for the other copy.


STEP 9
CTRL+click the “dragon” layer icon in the Layers palette.
Use the Brush Tool (B) with a soft brush set on pure white (press D to return to default colors, then X to switch to white) and start adding some lights on the dragon. Make sure you have the layer mask selected. Do the same for shadows: select the other layer mask, press B for Brush Tool, press X to switch to true black and start painting.
You don’t have to be really precise with it, the “marching ants” selection won’t let you past the contour.


STEP 10
Now or dragon seems to get some contour, right? Select the 3 layers and drag them on the “New Layer” icon. Then merge the newly created layers (CTRL+E)
and turn off the other ones. Place them in a folder if you like, then turn off their visibility. With this done, lets move further to open the dragon’s mouth!
Grab the Lasso Tool (L) and select only the bottom jaw like below. Don’t be afraid to go beyond it’s eye, dragon mouth’s joints are just like a snake’s.
Use the Move Tool (V) to rotate it and to move it in place. Then hit Enter key then CTRL+D to deselect.


STEP 11
Use Clone Stamp Tool to cover up the imperfections: ALT+click an area, then click the area where you want to cover up the mistakes.

STEP 12
We have a dragon, but it also needs to be scary. So let’s add him some teeth! Open the “crocodile” picture. Grab Pen Tool(P) and select the upper jaw like STEP 2. Copy it and paste it in our drawing. Also repreat STEP 3: press CTRL+U and give him the same greenish tint like the dragon. Resize it with Move Tool (V) to fit the dragon’s jaw. Do the same for the bottom jaw. You should get something like this below.
I got second thoughts about the dragon’s color and I used Saturation/Hue again. I also erased the skin on the neck with Eraser Tool (SHIFT+E)Â and a soft brush.

Feel free to modify it as you please.
STEP 13
Notice that the teeth are green from that Hue/Saturation effect ? Let’s turn them into white! CTRL+click the layer in the Layers palette and grab the Brush Tool (B) with pure white and start painting them.

STEP 14
Select the jaws layers and the “dragon” and merge them (CTRL+E). Rename this “dragon” again. Now we can change our focus towards the castle.
Duplicate the “castle” layer (CTRL+J). Then go to Color Balance (CTRL+B) and give it a warmer look: move cursor towards Red and towards Yellow. I used the settings below.

STEP 15
Grab the Burn Tool with a soft brush, set on Shadows with a 37% Exposure and darken the shadows on the castle. Then switch to Midtones and darken the bushes, the brick walls a bit and the grass in front of the walls, to look like the image below. Leave intact the grass in the middle.

STEP 16
Since we want to turn this image into a dark day, let’s darken the sky a bit. Grab the Pen Tool and select the sky, same technique as STEP 2. The selection should be like the image below.

STEP 17
Right-click and select Layer Via Copy. This will copy your selection to a new layer. CTRL+click the new layer. Now go to Filter > Render > Clouds. Press CTRL+F until you are happy with the result. Set the Layer blending mode to Overlay and name it “sky”.

STEP 18
Double-click the “sky” layer in the layer palette to bring up the Blending Properties. Check the Gradient Overlay then click the tab. Set a gradient like below or feel free to use your own settings. The colors are: #330101, #02491b and #b2710c.

STEP 19
Let’s add the dragon’s shadow on the castle. Turn on the “dragon” layer’s visiblity. Create a new layer above the “castle copy” layer and set it’s blending mode to Multiply. Now CTRL+click the “dragon” layer to make a selection. Hit CTRL+SHIFT+NÂ to create a new layer. rename it “dragon shadows”.
Use Brush Tool (B) with a soft brush set on pure black (hit D) and start adding the shadows as you see fit. It should look like the image below.

STEP 20
Notice the left wing is spread wide, but it has no shadow on the castle. Let’s do that now. Remember the “dragon” layer group we created in the first steps?
Go back to it and copy the “wing1” layer above the “castle copy”. Now double-click the layer to open the Blending Properties and check Color Overlay and set it to pure black (#000000) and hit OK.
Set the layer to Multiply blending mode and reduce opacity to 60% or as you see fit.
Go to Filter > Blur > Gaussian Blur and give it a 15 px. It should look like this image below.

STEP 21
Dragons breathe fire, right? Right! Let’s do that. Open the fire packs and cut out some fire. This time you can use Lasso Tool (L), there’s no need for that tiresome Pen Tool. Copy it, paste it in our drawing. Name this layer “fire breath”. Set layer to “Screen” blending mode.

STEP 22
Fire means light. Let’s make it glow a bit. We’re not going to use the Outer Glow blend property. We do this professionally! Duplicate the layer (CTRL+J) and set layer to “Color Dodge” blending mode. Select the “fire breath” layer, then go to Filter > Blur > Gaussian Blur and give it a 40 px blur. Hit OK. Use Burn Tool to clean up the rough edges. Bend it a bit with Warp Tool (Edit > Transform > Warp)

STEP 23
Now we set the castle on fire. I know this will sound really weird, but let’s add the smoke first, then the fire. Create a new layer(CTRL+SHIFT+N) above all the layers and name it “castle smoke”. Now grab the Eliptical Marquee Tool (M)Â and draw an elipse with a 30 px feather above the entire castle like below. Then go to Filter > Render > Clouds.Should look like below.

STEP 24
Set the layer to “Lighten” blending mode. Use the Eraser Tool with a soft brush, 48% Opacity, 52% Flow to clear the rough edges and the extra smoke.Should look like below.

STEP 25
Now for the fire. Open the fire packs and cut out pieces you like. Then place them on the walls like in the image below. Resize them as you see fit. Use the same technique as in STEPS 21-22, then merge all these fire layers (select them using SHIFT+click, hit CTRL+E). Rename this to “fire on castle”.(25). Should look like below.

STEP 26
Remember we left a part of the grass “unburned” ? Well this is why. Create a new layer above the “castle copy” layer and name it “light on grass”. Set it to “Color dodge blending mode. Grab the Eliptical Marquee Tool (M), set feather to 30px and draw a large elips above that unburned grass. Now grab the Paint Bucket Tool (G). Hold ALT key to pick a bright color from the fire and fill the elipse with it. Hit CTRL+D to deselect. Should look like below.

STEP 27
Now for the sun rays. Create a new layer above the “light on grass” layer. Name it “sunlight”. Grab the Rectangular Lasso Tool (L) and make a selection like below.

STEP 28
Go to Filter > Render > Clouds. With the selection still on, go to Filter > Blur > Radial Blur. Use the settings below.

STEP 29
Set the layer blending mode to Overlay. Now press CTRL+B for Color Balance window and give it a yellowish tint.

STEP 30
Now for the text. Use the Horizontal Type Tool (T) and write anything you want. Make sure it’s above all layers. I used the Medieval 3 font from [url=http://www.designious.com/fonts/]here[/url] but any font would do. It wouldn’t look have the same forged iron look though.
Double-click the layer to pop up the Blending Properties and check Bevel and Emboss, Gradient Overlay and Outer Glow. Use the settings below.(30),(30.1),(30.2)


STEP 31
We want to give it a feeling of red hot iron so this is what we do. Create a new layer above the text one. Set it to “Color Dodge” blending mode. Grab the Brush Tool (B) with a soft brush and a red vivid color (any would do nicely). CTRL-click on the text layer to grab selection and draw some lines on the upper part of the text until you’re satisfied with the result. It should look like below.

STEP 32
Let’s set the text on fire. Go back to the fire packs and cut out parts of fire. Paste them above the text and resize it until you like what you see. Repeat this ultil the entire text is covered up. Now we’re going to do a little trick so the eye focus will get off the text. If you look at the picture after 10 minutes, you’ll notice that you’ll look at the text first, not at the dragon. So let’s fix that.

Merge all the fire layers on the text. Now go to to Filter > Blur > Gaussian Blur and give it a 6 px blur. Hit OK. Should look like below. That’s it!
FINAL IMAGE

Hope you enjoy it!
Great tutorial! I would love to try that when I have the time. I'm thinking of having the design project printed for my nephew. He'd love to have that displayed on his bedroom.
This is bad on so many levels…don't even get me started on that beveled embossed undergoing flames text.
This is bad on so many levels…don't even get me started on that beveled embossed undergoing flames text.
There are many different reasons why you might learn to start bigger. You most likely are an increased faculty sportsman attempting to increase your proficiency about the basketball court docket and you should be someone that really can feel they’ve an amazingly smaller straight (don’t be anxious, you’re not by yourself). There are a countless number of strategies to go about getting to know how to display an increased top to bottom. Despite the fact, there are several key points that all person really wants to want before they get started off:
The first issue to know is actually that there is not a secret route to lunging excessive. Relatively, it is best to work for the right muscle groups in the perfect time ( space ) if you the following appropriately, you can learn learn how to hop excessive only just alone all-natural abilities.
First of all, while studying the way to jump excessive, you should work with an individual’s calf muscles. Decent activities feature bottom increases not to mention calf grows. Later on despite the fact that, you’ll desire to come nearly 400 and even 500 of each one.
The perfect Workouts
The subsequent help studying find out how to start more significant will be to understand exactly what any workout routines. Swinging inside and outside by itself is a superb workout. Running piece of string is an excellent course of action to be able to want to a product that doesn’t start looking silly. However, simply just lunging down and up at a time shall be much like very helpful. You’ll would like to develop your main hip and legs – the very best muscles workouts to get the ones main finished vertical jumps.
You should complete these workout plans competently to circumvent any specific harm (speak to some train if you desire aid providing them with all the way down accurately How to jump higher
This photoshop tutorial blog site help me to rise up my photoshop knowledge. Thank you all of admin of http://www.pixel77.com